
Accessing Marmotta the fist time using a HTTP request at the hostname ( e.g., http://localhost:8080/marmotta)will automatically configure Marmotta with that hostname to be used for naming resources. If you access it using a local name like localhost or 127.0.0.1 resources created by Marmotta - such as Linked Data Platform containers - will not have accessible URIs.
Note that the host name and port you are using for the first access to your installation is important since decides on how Linked Data resources will be handled later. If you plan a production deployment, you should therefore directly deploy on the server you are going to use and access it via the host name it will have in the future, or manually set the following settings:
kiwi.context = http://marmotta.example.org/
kiwi.host = http://marmotta.example.org/
kiwi.setup.host = true
where kiwi.context indicates the base URI that Marmotta will consider for local resources, kiwi.host is the base URL to access the admin interface, and kiwi.setup.host = true avoids getting the host configuration overwritten. In case you are running Marmotta behind a proxy, kiwi.context should contain the public URI, and you can keep the internal one used as kiwi.host.
You can now access the Apache Marmotta Web Admin Interface through your browser, e.g. by accessing the URL: http://localhost:8080/marmotta. There you can configure quite some aspects of Marmotta.
Marmotta uses a home directory to save some data. By default launchers will use ${java.io.tmpdir}${file.separator}marmotta (/tmp/marmotta in Unix systems, C:\Users\User Name\AppData\Local\Temp\marmotta on Windows), but you can customize the path to that directory by using the marmotta.home system property or the MARMOTTA_HOME environment variable. In that directory, Marmotta uses the system-config.properties file to store all system configuration; please, modify that file carefully.
In case you are not going to use Marmotta for something serious, take into account that the embedded H2 database is only recommened for demos and quick installations, the first step you should do is to configure a different database (PostgreSQL is the recommended one). The database can be changed in the Storage Backend configuration (Storage Backend: KiWi -> Database) as shown in the following screenshot:
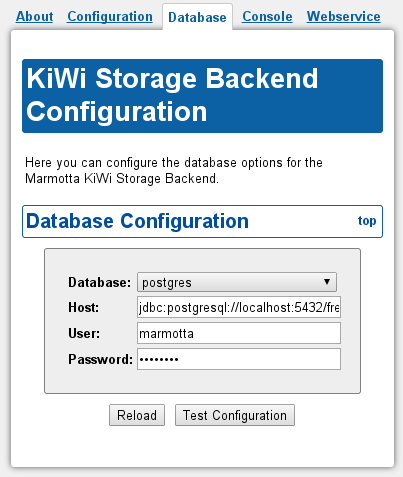
Please, take into account that the RDF data from the current database is NOT migrated to the new one when configured.
In case it is necessary, an expert user can manually write the same JDBC configuration that such dialog provides to the system-config.properties file:
database.type = postgres
database.url = jdbc:postgresql://localhost:5432/marmotta?prepareThreshold=3
database.user = marmotta
database.password = ********
Apache Marmotta can only connect to an existing database with an existing user and password. It will create the necessary database tables the first time it accesses the database, in case they do not exist yet. On first start the database should therefore be empty, or otherwise you will have old data in your installation.
Special note for MySQL: for legal reasons, we cannot distribute the MySQL Java drivers that are needed to access a MySQL database. Therefore, in case you aim to use MySQL for Marmotta, please download the MySQL JDBC connector manually and place it either in the application server lib/ directory or in theWEB-INF/lib directory of Apache Marmotta.
When deploying Marmotta in a production environment (i.e., public instance potentially open to intrusions), there are some considerations to take into account:
Disable public access to the administration user interface (further details at the security module), for will you would need to add these rules to your system configuration:
security.permission.admin_ui.pattern = /./admin/. security.permission.admin_ui.methods = GET,POST,PUT,OPTIONS security.permission.admin_ui.roles = manager security.permission.admin_ui.priority = 5 security.restriction.admin_ui.pattern = /./admin/. security.restriction.admin_ui.methods = GET,POST,PUT,OPTIONS security.restriction.admin_ui.priority = 4